
GENERATING A NOT TRASH PANDA 3D MODEL
My Photogrammetry Workflow of a Garden Statue Raccoon


Trials, Errors, and Updates: Rebuilding My Raccoon Model in Agisoft Metashape
What should I post? What should I write first? Coding, applications, or maybe AI?
Then it hit me—why not begin with the foundation that sparked so many of my innovations? 3D model creation has been the backbone for developments in VR/AR, AI integration, LLM-driven agents, and even the programming languages that make these models available online.
So, with that thought, here’s where I’ll begin: my first Substack article.
This writeup is an explanation of one of the first photogrammetry projects that pleased me. This is a model of a little raccoon ornament that was in the backyard. I learned a lot from my trials and errors, so I hope they can be useful for you, too. The original model was made a few years ago, making my original process out-of-date. I remade the model with the most recent version of Agisoft Metashape as of August 28, 2025. Any screenshots will be based on this date.
Camera Setup
I used the NIKON COOLPIX P600, my original point-and-click camera, on a basic tripod. However, I have moved on to the Canon G7X Mark II on a tripod with a transverse center column. The larger aperture/lower f-stop number has been useful for product pictures, which somewhat applies to photogrammetry, but the addition of a touchscreen makes focusing a breeze. The aperture is size of opening in a camera lens; a larger aperture is shown with a lower f-stop number (these are represented as a fraction, so a smaller denominator means a bigger number!) lets more light in. On the other hand, your depth of field is shallow. In photogrammetry, you might need a better depth of field instead of the lighting, so a larger aperture is not necessary. However, I show that one doesn't need professional equipment to make pleasant models.
For the model, it was placed on a glass shelf held up by two chairs. I used two LED light stands, so the lighting was adequate but somewhat uneven. This design is unorthodox, but I wanted to see how the software would handle glass with its glare and reflections. More common methods are creating and merging multiple chunks, in different or the same environment, or using a sophisticated 3D scanner.
Making COOLPIX
I took around 120 snapshots of the raccoon on the glass. I take pictures in layers, aiming to have around 20% overlap between images. I change height and angles when moving to a different layer, at least for everything visible above the glass. However, my tripod doesn't fit below the glass shelf, so I need to improvise. The bottom pictures were taken while I was on my back. The rule's the same, though; attempt to create overlap.

I know I'm not perfect. After the first batch of images, I upload them to my desktop for review. Any blurry pictures get thrown out and retaken. At this point, we're done with the camera. Unless, of course, we fail to create a model.
Agisoft Metashape and My Start
Most of these upcoming steps are not original. I used these sources to learn more after failing my first projects:
https://agisoft.freshdesk.com/support/solutions/31000009453
So, Agisoft Metashape is pretty straightforward. If you followed the buttons in the Workflow tab, you'd likely get a usable model. The first time I followed this workflow, I was pretty impressed. I'm a lazy perfectionist, though. I want to see the bottom, but I don't want to make multiple chunks. With the glass, you'd see an ugly reflection. The process needed to be refined.
For reference, my desktop is an AMD Ryzen R7 5700X, an NVIDIA GTX 1070 ti, and 64GB of RAM. I'm mentioning only the settings I've changed and used.
Camera Alignment
Workflow -> Align Photos
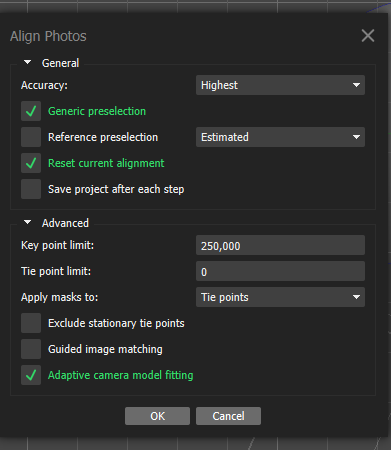
Here's a quick explanation of the settings I change:
Accuracy is a range. The higher the accuracy, the more accurate the key points are. Sometimes, cameras won't align, and you'll need to use a lower accuracy.
Generic preselection is a sort of filter to save time. The program will look for pairs in images. No matches means no alignment between those images.
Key Point Limit is the maximum number of points created through the features present in the images. I've noticed that a higher key point limit (100K to 250K) sometimes allows a better alignment.
Tie Point Limit is the number of points that tie images together. The default is 0, which means unlimited, and I never change this number.
Adaptive Camera Model Fitting allows Metashape to dynamically change camera parameters. No, I'm not entirely sure what that means, but it improves my alignment.
After a successful alignment, DUPLICATE!! Right-click the chunk in the left menu and select duplicate. This can be done on any item, such as the models or masks, in this menu, and you can simply click on it to view it. It'll save you heartache at some point.
Point Optimization
Tools -> Tie Points -> Clean Tie Points
Tools -> Optimize Cameras


This part of process isn't directly mentioned in the workflow. I concur with others, though. These steps really do improve the model and the chances of success. The numbers won't always be exact match for your project, so don't be afraid to experiment. (You made a duplicate, after all, right?)
Step 1: Reconstruction Uncertainty Select a number around 10. Delete them. The uncertainty is too high for these to be helpful. If too many points are gone, you can try with a higher number to save the model.
Step 2: Optimize Cameras No shortcut exists in Metashape Standard, but it's in the Tools menu. I still use Adaptive Camera Model Fitting, but if you understand this menu, feel free to select. You might lose some cameras, but that means they weren't good fits in the first place.
Step 3: Reprojection Error Select a number around 0.5, and delete these points. You might not even have points to remove, and you can jump to step 5.
Step 4: Optimize Camera Refer to Step 2.
Step 5: Projection Accuracy No one-fits-all number exists here. I also aim to remove around 10% of the remaining points, but I start with a larger set of points.
Step 6: Optimize Camera Refer to Step 4.
Step 7: Manual Review and Point Removal Take a good look at your sparse cloud. You may need to remove some points manually. For example, I still had a partial reflection from the glass, so I selected and deleted that section. I've also encountered clouds with missing components, which meant my images were a failure in some regard.
If you ever look at the processing report, you'll see a section for a camera alignment. Your entire model should be blue, as we've removed all the points with a suboptimal number of cameras.
Optional Masks
Workflow -> Build Model
Tools -> Generate Masks -> From Model

I say optional, but they make life much easier when dealing with glass and reflections. Masks also remove any floating bits from the depth maps, but if you're skilled (or lucky), they're unconnected and can be removed easily at the end.
Step 1: Build Model based on your optimized tie points. The quality or face count doesn't matter at this point. I leave it on the default options.
Step 2: Generate Masks After generating the masks, review the masks in the left-hand navigation menu. Sometimes, little slivers of the item can be hidden, and you should adjust them.
The Real Deal
Workflow -> Build Model
Tools -> Model -> Various Options

Now, it's finally time to make a real-world model. If you've made masks, you've already seen this menu. In the standard edition, depth maps are the default, and it's what I use. Most of these options are thankfully straightforward.
Step 1: The Model I prefer to start with a high or ultra high quality model with a high face count, and then decimate to smaller models. Depth filtering is usually set to ""Aggressive," but you can weaken it if it filters important projections. Calculate vertex colors can be left on or off as needed, but I always activate this setting.
Step 2: Touchups Make sure to duplicate the model. Now, take a look at the model. You might have holes, some bits floating about, or faces hidden inside the model itself. Here's a list of tools that I use the most:
Decimate Model: You can reduce the number of faces present in the model, making the model simpler and easier to use.
Refine Model: This options makes the model more detailed and refined. Since I begin with an ultra-high model, I almost never use this.
Smooth Model: This shrinks elevation and noise in the model. If you see unexpected spikes, try using this.
Clean Model: Many options are present in this tool. I often use the unconnected pieces option, move it to 99, and then delete these bits.
Close Holes: This tool closes any holes on the model.
Almost There!
Workflow -> Build Textures

eral options exist in this menu, and the best ones will depend on your images and project. I really recommend experimenting here. For example, the best blending mode for my models has been “Mosaic” or “Average.” Texture size/count depends on your requirements for fidelity or file size, but true squares, such as 8192 x 8192, appear to be more efficient to create than other resolutions, like 4000 x 8000.
What About Scaling?
Tools Menu -> Markers -> Print Markers
My clients didn't care about real-life scaling, as digital objects can change size on demand. I also use Metashape Standard, and these settings are only available in Metashape Pro. If scaling is important, such as in 3D printing, you must have images with scale markers or coded targets. You then need to create a scale bar by Placing Markers in Metashape or by Detecting Markers for coded targets. This refinement can be done at any point, as long as the markers are available in the images somewhere.
Notes To Consider
You might notice your model's origin isn't correct. Personally, I think Blender is more intuitive for fixing this issue. We’ll explain that in another new research and development article and report the issues and findings on correcting model’s axis center.
Also another tip, if you’re trying to make a very thin mesh model, you’ll likely won't succeed in creating a model without holes or imperfections. You'll need some tweaks found at a Agisoft FAQ page.
Have any comments or questions? Post them! I'm always happy to listen, converse, and learn something new.